


How to publish your Android app?
We assume that you have already the following:
- playstore account
- apk file
- screenshots of your app
How to publish your Android app?
- Login at https://play.google.com/apps/publish/

- Click CREATE APPLICATION.

- Input the title of the App, Short Description, and the Full description.

- Upload screenshots as requested with dimensional requirements (ex: feature graphic should be 1024×500).

- Upload screenshots for TV banner, Daydream 360 image, and input promotional video if there is.

- Select a category for your app, content rating, website URL, email, phone number, and privacy policy for your app.
- Select SAVE DRAFT.
- Go to PRICING AND DISTRIBUTION tab as shown below.

- Select FREE as you want to publish it free, or select PAID if you want to be as paid by download.

- Fill out the required fields such as select Available to All countries, and so on. Then select SAVE DRAFT.

- Go to App Releases tab, and select Manage Production. Select CREATE RELEASE.
- Select CONTINUE and ACCEPT the agreement.

- Browse and Upload your APK FILE, input your Release Name (ex. Cupid-1.0), and Input the release notes. Click SAVE.
- Go to the CONTENT RATING tab, and click CONTINUE.

- Input your email address, and select APP category. Answer the next questions honestly to determine your content rating. Click SAVE QUESTIONNAIRE.
- On the same page, click CALCULATE rating. Next is select APPLY rating.

- If you have all CHECKMARKS like the photo above, you are ready to publish your android app.
- Last step is to review and publish apk rolls-out. Go to App Releases tab, and click manage releases. Below the page, click REVIEW.

- Click the Start Rollout to Production and click Create Release.,

- You can see the status in the photo above the word “Pending Publication”.
- Finally, you have published your android app. Wait for the approval of your android app within 24 hours.
You may search your Android App at the playstore to check if it was already approved.
How to get a Google Playstore Account?
Do you want to publish your APPs at Google Playstore? Do you have a credit card, mastercard, or visacard with at least $25 balance? and Do you have a website for your APPs? If your answer is Yes, then you are ready to publish your app in the playstore.
One thing more to consider is, the content of your app which includes wordings, phrasings, most especially the photos, must be self-made by you or your developer. If any contents is found to be a copy or downloaded from other sources, then your app will not be published and your account will be banned for publishing apps.
So much for that, here are the steps on how create a Google Playstore account:
-
- Open any browser and login at https://www.gmail.com
- Visit https://play.google.com/apps/publish/signup/

- Put a checkmark on the option “I agree and I am willing to associate my account registration …” and click CONTINUE TO PAYMENT.

- Fill in the required information as shown above with the Name, Card Number, Date of Expiration, CVC code that is located at the back of the card, and Billing Address, and select PAY.
- Congratulations. You have your own Playstore Account.
You may want to see “How to Publish your Android Apps?“.
How to create your own custom email account?
You are thinking if you can have an email address something like iam@handsome.com? or anything you want? Well, it is possible! Just follow this steps and consider my advices.
Firstly, before going into the procedures, you should have your own domain name (ex: erickabuzo.com). If you don’t have, you can buy one HERE.
Considering that you have your domain and cpanel account,
1. Log in to your cPanel > Mail section > Email Accounts menu:

2. If you have multiple domains, select the domain you want your email account to be associated with in the drop-down list in the top right corner and enter the desired email and a strong password of your choice:

Click on Create Account once all is set.
3. To log in your own webmail, visit in your browser’s address bar:
www.yourdomain.com/webmail
4. Once done, you will see the icons of the three webmail interfaces:

5. Feel free to choose any access webmail. I suggest Read Mail Using SquirrelMail.
Hostscripter is now at Lazada!
![]()
On March 18, 2018, HostScripter Web Services is finally at Lazada. Because of this opportunity, we are giving discounts if you order at our Lazada shop instead of directly making order here at in our Website.
We have also less P50 pesos for first 10 customers using the voucher code “HOST50LESS”.
Register at Lazada account?
Register for a Lazada account is fast and easy.
Go to www.lazada.com.ph/customer/account/create/ Or click on Signup in the top right corner of the page
Lazada will send a link to your email address that will enable you to create your new password. Once changed, you can now log in to your account with the new password.
How to Order your Web Hosting?
- Login at your Lazada account.
- Visit https://www.lazada.com.ph/hostscripter-web-services

3. Select the hosting you want (ex. P800 pesos 5gb hosting)

4. Click the the ADD TO CART button.

5. Click the PROCEED TO CHECKOUT.
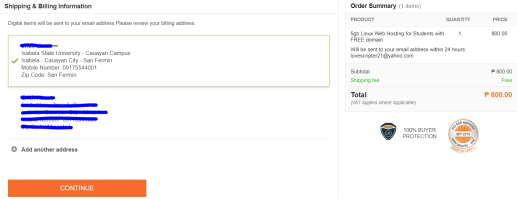
6. Click CONTINUE.

7. Select Credit or Debit Card (Any Mastercard or Visacard) and input the details on as shown in the screen. CVV code is the 3-digit code found at the back of the card. Input “HOST50LESS” at the voucher code field to get P50 pesos discount.
8. Click PLACE YOUR ORDER.
9. You will receive confirmation of your order via SMS and you’ll be asked to fill out information.
9. Wait for your hosting account to be sent to your email address within 24 hours.
“Congratulations, you spent 750 pesos instead of 850 pesos”
Recent Articles
- Grade Tabulator
- Part 6: Create your own Registration System using PHP and MySql
- Part 5: Create your own Registration System using PHP and MySql
- Part 4: Create your own Registration System using PHP and MySql
- Part 3: Create your own Registration System using PHP and MySql
- Part 2: Create your own Registration System using PHP and MySql


